Hey just dropping a quick post here because it’s been a while and I don’t want to lose my content here…all the recipes and family stuff. I haven’t blogged at the new blog in a while either but I am posting on instagram here
Hi, y’all. 🙂
Obviously I’m no longer blogging here. Many things have changed since the last time I posted. I’m leaving this blog up for the recipes and stuff but I am now blogging at
just a texas girl and her blog
I started it earlier in the year and then got really sick and am now in the process of getting back into the groove of both cooking and blogging. I’m no longer gluten – free…so the blog might not be what most of you are looking for but just wanted to let y’all know where you can find me.
🙂
Mama L and I have now been sugar free (and very low acid) for 3 months. 🙂
It’s been interesting to say the least. The first two weeks were just plain torture for me. Looking back on it now I still can’t believe how unbelivably difficult it was for me to give up sugar. I guess it shouldn’t have been such a shock…considering how much sweet stuff I baked on the regular…but I just never imagined it would be so rough.
After we made it 8 weeks I had every intention of reintroducing sweet treats (made with alternative sweeteners) and I did try that. The sugars were fine…even kid approved. Tested them out on my adorable neighbor kids. But I didn’t like the way they made me feel. Plus I started to obsess over what I’d make next and when.
I decided that even the alternative stuff had to go. I want my body to absorb nutrients and I just don’t think it’s going to do that if it has the option of living on sweet…real or fake.
I’m not saying I’ll never eat / bake a sweet again. Not saying that at all. But for right now my plan is to go as long between sweets as possible.
While I’m 100% resolved to that plan it’s also bringing about a little identity crisis.
What am I if I’m not ‘Jennifer the cook / baker’?
Ever since I was a pre teen I’ve been the family baker. Creating in the kitchen has always been one of my greatest passions. And no matter how hard you try…something savory is never going to have the wow factor of something sweet. It just doesn’t.
So who am I now?
I need a new passion. A new hobby. I even pulled up the list of continuing education classes at a little local junior college. Side track break here…can y’all believe that this little rural type junior college offers continuing ed classes in beginning Chinese? Maybe I’ll learn to speak Chinese.
It’s hard too because I love bloging. I adore my regular readers. Y’all got me thru the first 13 months of celiac. Starting this blog was the very best thing I did last year. It forced me to get out of my funk of having yet one more health problem and instead channel that sadness into creating stuff for the blog. Creating stuff that made the celiac a non – factor in so many ways. I hate that the focus of the blog has to change. I don’t want to lose y’all…or to lose this great source of support. 🙂
Anyway…that’s where I am now on the food front.
I do still allow liquid Splenda drops in the occasional drink and in my Cream of Rice but that’s pretty much the extent of my sweet consumption right now.
Now…how bout a little transformation Tuesday? This is what three months of no sugar did to my body.

Lower bod the first week of June vs the last week of August.


It’s also been a little over 3 months since I chopped off all my hair to grow out the grey. Pics from last week. I have a lot of natural waves / curls (depending on the weather) so right now it’s just wanting to stand straight up or out to the sides most of the time. It’s a mix of white-grey and gun metal. I really like the gun metal. I’m going to do a full before / after post in December…when it’s been a year since I stopped the dye.
This has been one of the very best things I’ve ever done for my heath. Putting those chemicals and smells onto my body wasn’t healthy and I’m so glad I finally said enough is enough. 🙂 Don’t get me wrong…I HATE the length right now because I just don’t like short hair on me but once it grows out I’ll have no complaints at all about this decision. 🙂
Mama L has had an amazing transformation too but y’all know she won’t let me post her pics. She also won’t let me pick her out some new clothes for her new bod. Please please please let me dress you, Mama L. 😉
So anyway that’s a look at where I’m at right now. Thanks so much for reading. I’ll still be posting at least once a week (hopefully more). I’ll share savory gluten free recipes…music…and I’m also going to just start bloging about whatever too. Hope y’all will hang around. 🙂
Hi, y’all. 🙂
I promise I’m not giving up on the blog. It’s just taking me a little while to figure out my little place here on the internet now that I’m not cooking sweets (and regular meals are so boring). I’m going to write much more about this next week when I also hope to get thing back to some sort of ‘normal’ around here. 🙂
This week has been very boring in every way. I really took the week to just chill and do as little as possible. Today I had a massage and that was great.
Earlier in the week Papa L got me this adorable new piece for my Le Creuset collection (thank you, Papa L) …
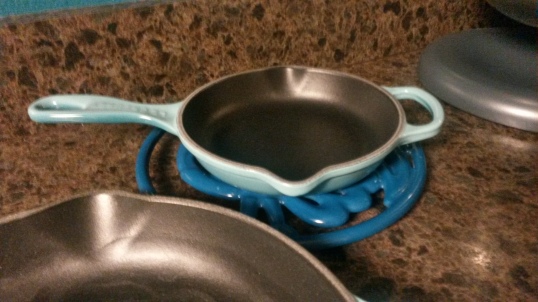

The baby cast iron skillet. I named her Consuela. In case you don’t know…her sister…the large skillet is Carmelita.
(Consuela because to this day my favorite TV character of all time is Suzanne Sugarbaker on Designing Women. I love all those eps where she’s ranting about her maid, Consuela…esp the one where she pays Anthony to take Consuela’s citizenship test. I know. I’m silly. Don’t care. 🙂 )

This was actually my favorite meal this week. Y’all know I don’t do sugar anymore but I do still love breakfast for supper. Pancakes and waffles must have some kind of ‘syrup’ though. SO…I just cooked down some frozen whole blueberries till they reduced and used that as my syrup. LOVED this. Next time I’ll puree the berries first and then cook it down to syrup consistency though. I think it would be a more natural mouth feel. I’m also going to try it with strawberries.
That’s really about it for this week.
Oh but before I go…something that will only be of interest to some of my readers…
Tonight…the little town that cultivated the roots to my soul…that taught me be ‘me’ and nobody else…the place where I spent age 4 – age 25…is hosting my current little town in football. GO WILDCATS !! Show ’em how a real football town does it. 😉
Ok now let’s send summer out the same way we started it…with my fav summer song. 🙂
Have a great / safe long weekend. See y’all next week. 🙂
Hi, Y’all. 🙂
My iron related energy levels just flat out suck right now and I’ve been sticking to quick simple (with as little heat required as possible) meals.
This pasta salad is something I have to have every summer and it’s pretty easy to make too.
I’ve told y’all before about how for the last 6 and 8 years of their lives I saw my Mema and Pappy at least once a week. Every Thursday I’d go to the house and pick up some clothes to wash and during football season make our pick ’em picks with Pappy.
Almost every Thursday during the summer Mema would have this shrimp pasta salad waiting for me.
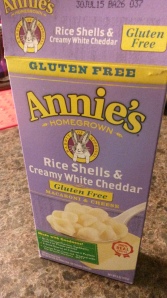
Now…I know that once y’all read the rest of this you’re gonna be saying to yourselves ‘Crazy Jennifer, everybody and their dog who bought a package of Skinner shells in the early 90’s knows this recipe.’
Nope. Sorry. You’re wrong. 😉 It’s my Mema’s recipe. She invented it. 😉
The original recipe was on the small Skinner pasta shell bag so obvs it called for Skinner shells. And double obvs to the fact that those are a long gone pantry staple for this celiac.
No sads though…Annie’s shells work great here. The shells only for this recipe. Save the cheese pack for something else. 🙂 These are the only gluten free shells I’m able to find in my area.
This is so simple to make. While the shells are boiling…

…chop celery and boiled / cooled shrimp.

When the shells are drained and cool combine pasta / shrimp / celery and stir in mayo to taste.
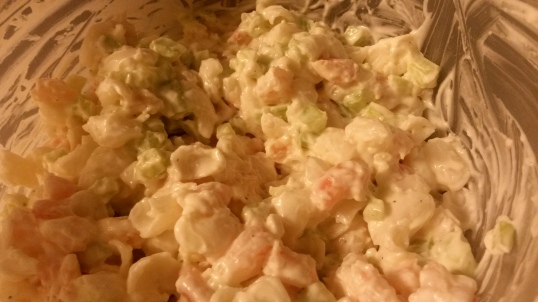
Salt and pepper to taste then chill til ready to eat.
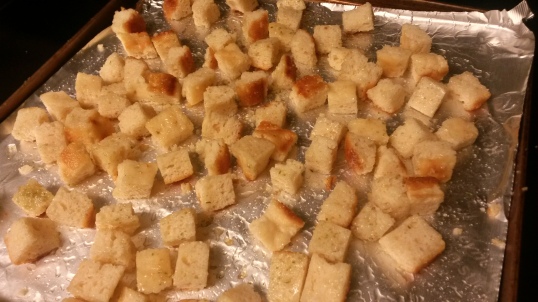

I found some frozen bread I’d saved for crumbs and instead made homemade croûtons following gfandme’s instructions and using my own seasonings.

You can serve it over greens but y’all know I drink my greens so that ain’t happening over here. 🙂
I just eat the pasta with croûtons plus a squirt of ranch just because I love the flavor.
Have a great weekend. 🙂
Before I get started with todays post…
I want to take a second to say Congrats to Papa L. 🙂 Today marks his one month anniversary of giving up chewing tobacco. He’d been dipping for around 30 years and just woke up a month ago and quit. That’s right…we’re all getting clean over here in the rural route. 😉 I’m going to do a future post about something that’s helped him get thru the urge to chew but for now…congrats, Papa L…we’re so very proud of you. 🙂
Now…I don’t know if y’all read about this a couple weeks ago but I know it made the media rounds.
Freezing avocados.
What?
I’m lucky to live in an area where we can get fresh / cheap avo year round…and y’all know we eat a lot of tex – mex in this house…but we also always end up with an extra one or two so I decided to give it try.
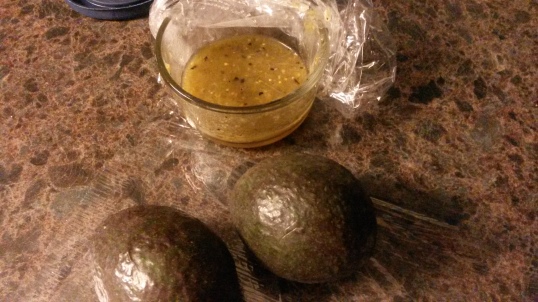
Avo and salsa.
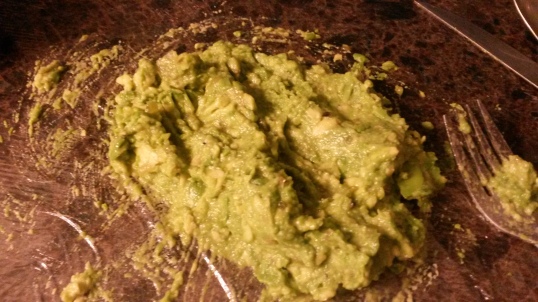
Mashed.
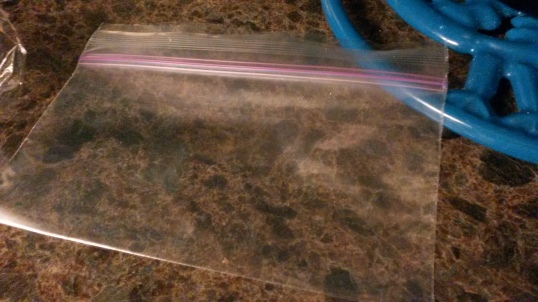
Small snack size baggies.
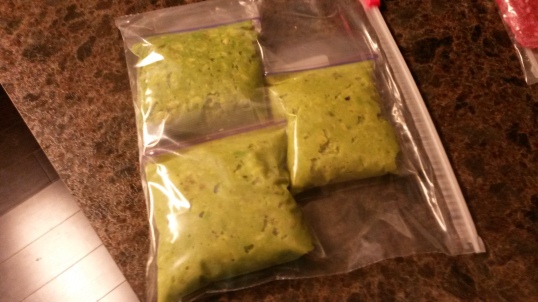
Packed tightly…sealed and double bagged.
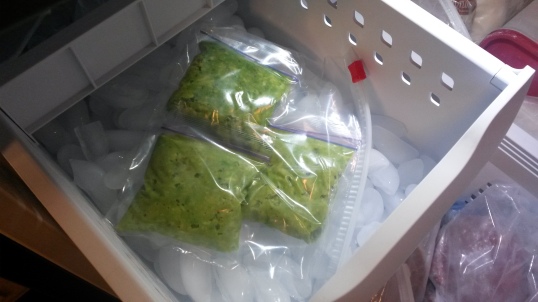
I put them in the ice drawer so they freeze faster.
I really had my doubts about this but it worked perfectly. I just grab an individual portion and thaw it in the microwave. My micro goes by weight so I just weigh it…throw it in the microwave and in a minute or so…guac ready to go. I really liked this.
The different articles said that freezing works best for mashed up avocados…that slicing them or leaving them in halves didn’t result in the best texture.
The green salsa mixture I’ve been using on avocados has a citric in the ingredients but if you don’t add a mix prior to freezing I’d squeeze some lemon / lime or sprinkle some ascorbic acid on it just to help prevent any browning before it reaches freezing.
This is a keeper. Give it a try if you find yourself with a ‘getting ready to brown’ av you want to try to save. 🙂
Have a great weekend. 🙂

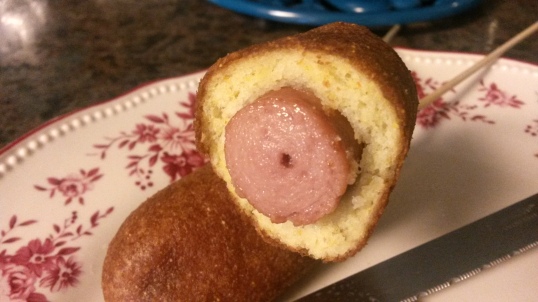
Shortly after posting the corn dog post last week…I came down with the dreaded summer cold. 😦 I hate having a cold so much…any time…but doubly so in the summer. It just always seems a million times worse when there’s a 110* heat index outside. All of that to say that the last week has been ridiculously boring in the eats department. I did however make it thru without one drop of sugar. As soon as I felt the cold coming on I was kind of worried I’d fall off the no-sugar train. Thankfully that didn’t happen. 🙂
I’m going to start playing around with coconut and almond flour in my baking. Not exclusively at all. We have a coconut allergy in the house so only some will be able to eat those recipes and l’ll definitely be restocking the Cup4Cup stash as soon as the temps hit the 80’s. It’s just that both almond and coconut flour contain iron and I’m trying to include iron rich food whenever possible. I can’t do iron infusions. I just can’t. So I’m trying everything possible to get my levels up.
Tonight I decided to try some coconut flour banana muffins.
I’ve baked with coconut flour before…when I was losing weight a few years ago…so I was already familiar with it. A little bit goes a long way and it also sucks up liquid like a very dry sponge. So if you’re not familiar with coconut flour and this seems like a whole lot of liquid…that’s why. Recipe at end of post.


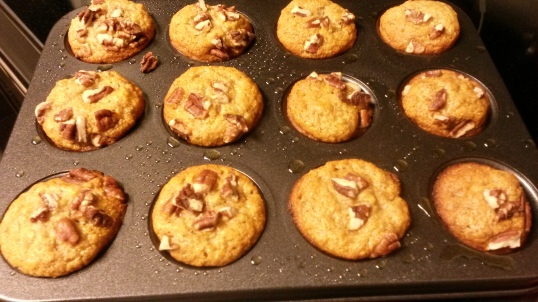
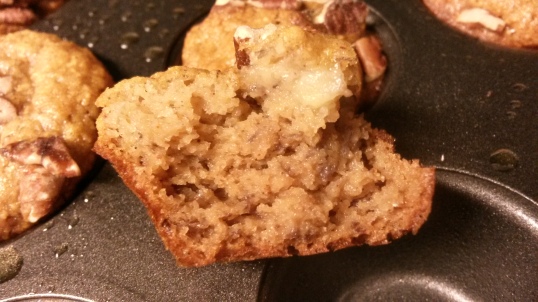
These were very moist and delicious and made me even more excited to experiment…but still just once a week or every other week with the ‘sweet’ stuff. 🙂
How are y’all doing? Staying summer cold free I hope. 🙂
Coconut Banana Muffins
1 mashed Banana
2 Eggs
1/3 cup Brown Sugar (or *Sugar Sub I used Sin Free)
3 tbsp Sour Cream
1 tbsp Oil (I used Macadamia Oil)
1/4 tsp Salt
1/4 tsp Cinnamon
2 tbsp Tapioca or Potato Starch
1/4 cup (36g) Coconut Flour
1/4 tsp Baking Powder
14 tsp Baking Soda
Optional:
Pecans or other nut
* 1tsp Molasses
If you use a sugar sub and want the flavor / texture of brown sugar…add 1 – 1 1/2 tsp molasses. I used 1 tsp and it was perfect. The rule of thumb though is 1 tbsp per cup of sugar.
Directions
Preheat oven to 350*
Oil or spray your pan really well or use liners.
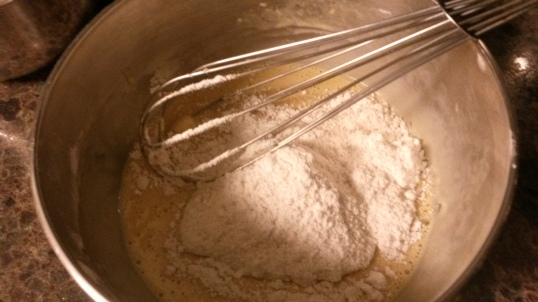
Combine wet ingredients and mix until it’s all blended together.
Combine dry ingredients in a separate bowl.
Add dry ingredients to wet ingredients and mix til smooth.
Stir in mashed bananas.
Let mixture sit for 5 minutes so the coconut flour can absorb the liquids. Because there are no gums in this…it will be more like a batter than a solid goop-y mixture.
Spoon or pour into muffin tins or mini bread pans and if using…top with chopped nuts.
Bake til golden brown. Mine took about 13 minutes in the convection oven.
Let cool a few minutes before trying to remove from the pan.
I got 18 mini muffins from this recipe. I haven’t tested it but I would double it to make 12 regular size muffins.
Y’all know I love me some theme days. 😉
Recipe at the end of post.
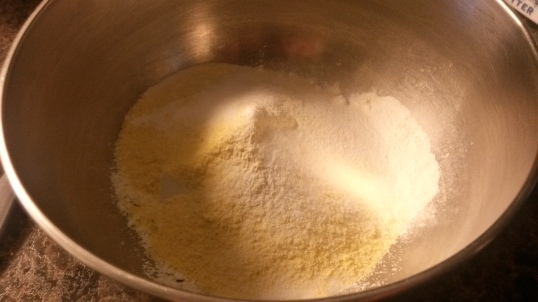
Cup4Cup, cornmeal, salt, baking powder, baking soda.

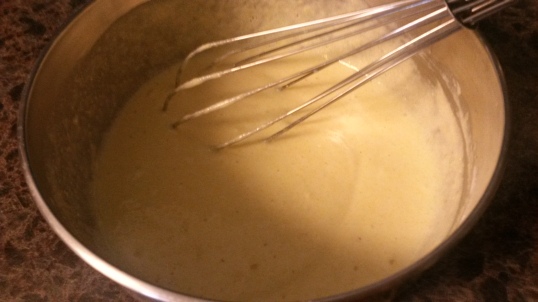
Resting for 10 minutes.

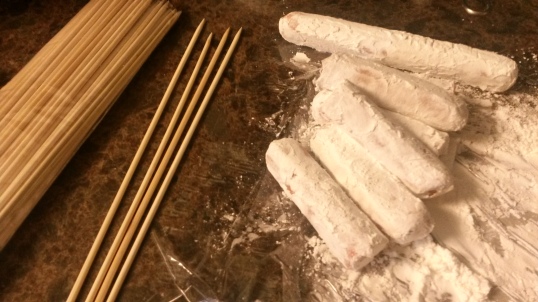
Rolling in cornstarch.
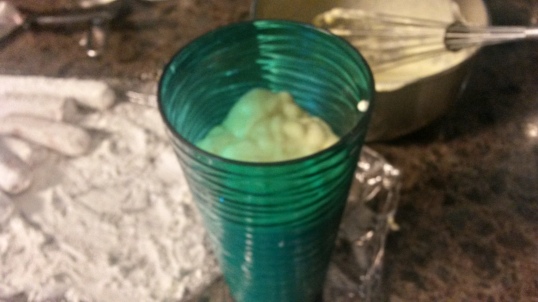
Use your skinniest cup for dipping. Also…the batter will look kinda fluffy.
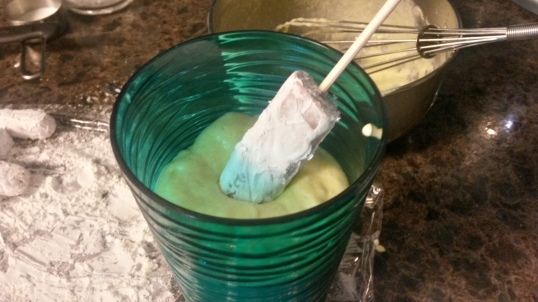
Dip in batter slowly and kind of slowly rotate at the same time so it will catch on and adhere. You want to make sure it coats every little bit.
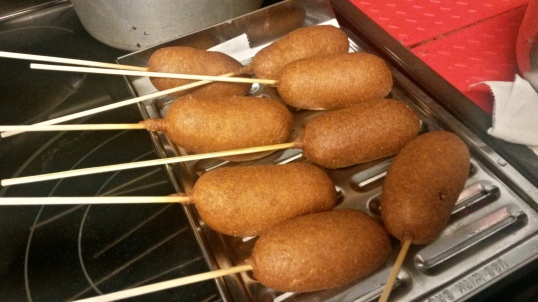
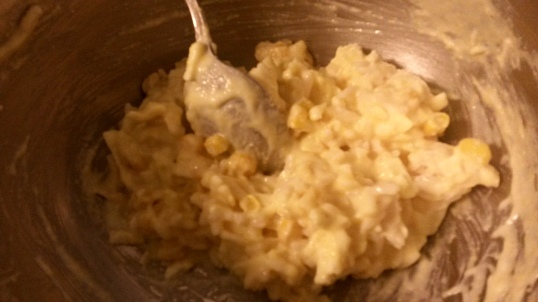
I threw some corn and cheese into the left over batter and made…

…cheese-y corn fritters. Super yum. 🙂
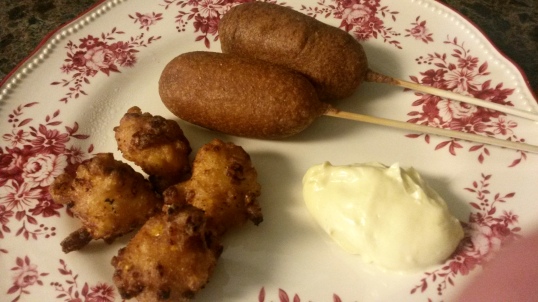
And then played like I was at a fair. A fair that serves fried food on pretty plates. 🙂
Loved this meal. I hadn’t had a corn dog in at least a year and a half and these are a keeper. The fritters weren’t really a recipe since I just threw stuff in the batter but they’re definitely keepers too.
I thought about making funnel cakes too but honestly just wasn’t that inspired to mess with anything (alternative of course) sweet today. What has happened to me?
Hope y’all had a great weekend. 🙂
Papa L’s not feeling well today so for todays summer song let’s do a little Beach Boys. 🙂
Corn Dogs
2/3 cup Flour (I used Cup4Cup)
1/2 cup Corn Meal
1 tbsp Baking Powder
1/4 tsp Baking Soda
1/4 tsp Salt
1 Egg
3/4 cup Milk
4 Weiners
Sticks or Skewers.
Directions
Combine all dry ingredients.
Add egg and milk.
Whisk to combine.
Let rest 10 minutes.
While the batter is resting…heat your oil to 375*.
Also roll wieners in cornstarch to lightly coat and then insert sticks.
After 10 minutes transfer batter to a tall skinny cup.
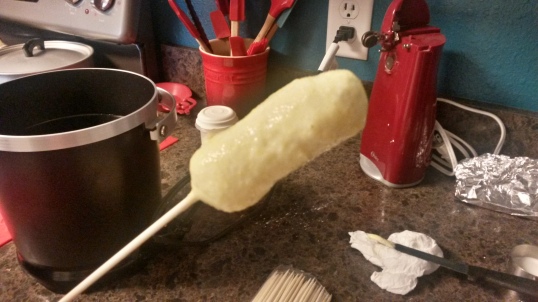
Dip each wiener in batter and then fry til golden brown. About 4 – 5 minutes.
Notes:
In order to fry the whole wiener / make full size dogs I would have needed to use a very large pot and I didn’t want to waste that much oil. So…I just cut the wiener in half and made little baby corn dogs.
Here in rural route I wasn’t able to find any proper sticks so I had to use little disposable bamboo skewers (Walmart…in the kitchen tools section). They worked great.
We are now well into our 8th week of Mama L’s acid elimination eating and still moving right along. It’s second nature now and I don’t really think about it all that much. Would I still like some real candy? Sure. But I want to sleep thru the night more. 🙂
I said I was going to share my alternative sugar blend in August but I’m going to go ahead and do it today since it’s a part of todays recipe.
Before I get started on that I want to say that…even though I have a sugar sub blend I Iike now…sweets are still going to be a once a week / once every other week or so kind of thing. I know it makes the blog boring but I’d rather have a boring blog than to reawaken my sugar demons. 🙂
I’ve tried 3 different sugar subs and the two I’ve settled on are…
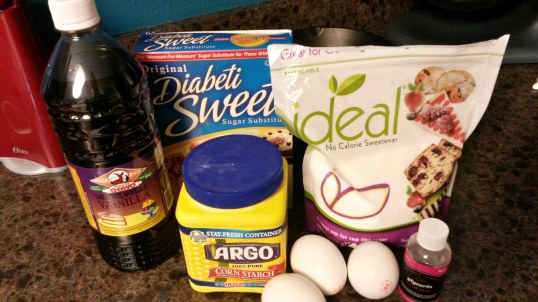
Diabetisweet. It’s an isomalt sweetener.
Ignore the ideal sugar sub…it didn’t work for me. It spiked my blood sugar and had me in the kitchen wanting to eat every sweet thing in there. I didn’t eat anything else but I had a very strong and immediate reaction to the ideal.
And…

…this new to the market sugar sub…Sin-Free Sugar. It’s a Xylose / Erythritol / Brown Algae blend and it is amazing.
Xyl / Eryth are both super low Glycemic Index sweeteners. Isomalt is low too.
I use equal amounts of Diabetisweet and Sin Free.
I used them both and made some really delicious homemade ice cream last week.
Now…this is supposed to be an easy dump / stir / freeze type recipe and it is if you can use all these products straight off the grocery shelf. But as y’all know…nothing is easy when you have to make everything from scratch.
The ice cream base called for a can of condensed milk so I just made my own. 🙂
1 can Evaporated Milk
1/2 cup Diabetisweet
1/2 cup Sin-Free
1 dash Salt

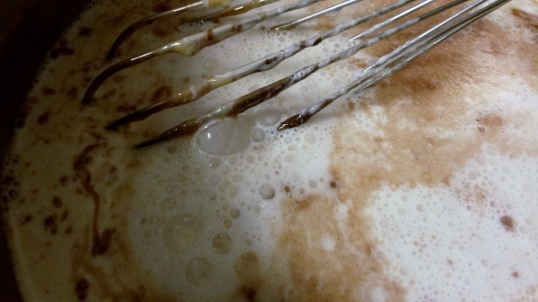
Cook on medium heat…whisking a lot…til nice and thick. I took a little while…maybe about 8 minutes. But it got to the actual consistency of the canned stuff so just keep stirring til you have that level of thickness.

It’s hard to see it in the pics but it really does thicken up. This last pic I was trying to show thickly it’s coating the pan.
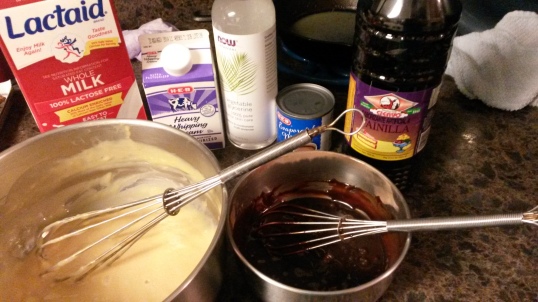
Condensed milk on the left and homemade chocolate syrup on the right.
Plus the rest of the ice cream ingredients. Recipe at the end of post.
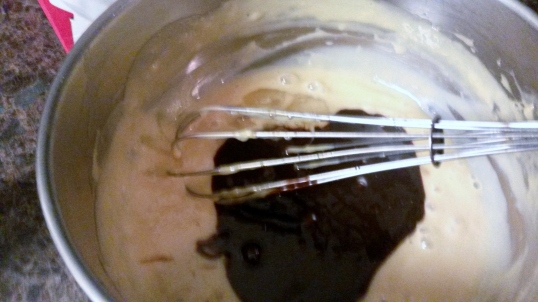
Chocolate syrup added to condensed milk.
Rest of ingredients added.
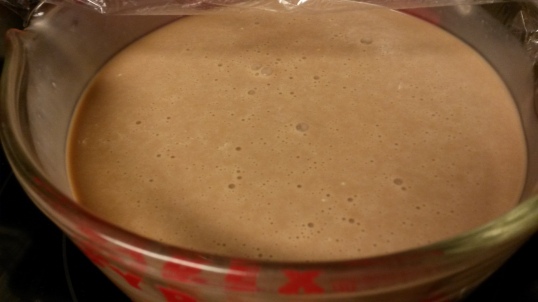
After freezing. Soft serve consistency.

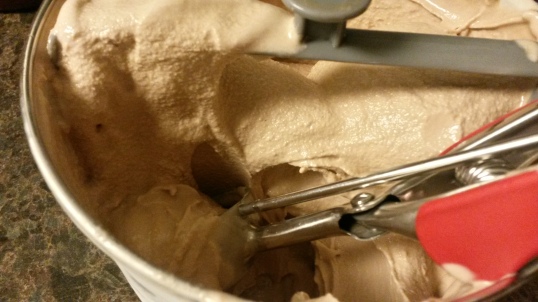
After setting up in the freezer for a couple hours.
This was definitely my favorite thing I’ve made in the last 8 weeks. 🙂 The original recipe is a sugar – full recipe so if you don’t need to make subs…it’s written to work with stuff straight from the shelves.
Have a great weekend. 🙂
‘Easy’ Chocolate Ice Cream
1 can (or recipe) Sweetened Condensed Milk
1 (5 oz) can Evaporated Milk
2 cups Milk / Cream (I did half milk / half cream but you can do all of one or the other)
2/3 cup Chocolate Syrup (*Hershey’s style)
Vanilla (to taste)
2 tbsp Glycerin (not a requirement for success but it helps the ice cream stay scoop-able from the freezer)
Directions
Combine all ingredients. Mix well.
Cover and place in the ice box overnight or at least 4 hours.
Pour into ice cream maker and freeze according to directions. (Mine froze for 1 hour.)
Eat it right away if you like soft serve or transfer to freezer safe bowl. Cover and let freeze for a couple hours.
*Hershey’s makes a sugar – free syrup that is sweetened with Erythritol and Splenda but it’s hard to find so I made my own…
Homemade Chocolate Syrup
2 tbsp Cocoa Powder
1/2 cup Sugar Sub
1 tsp Corn Starch
1 dash Salt
3/4 cup Milk or Cream
Vanilla to taste
Directions
Combine all.
Bring to a boil (whisking constantly) and boil / stir for 2 – 5 minutes until it’s almost the consistency of bottled syrup. You want to pull it off the burner just shy of syrup consistency because it thickens a little as it cools.
Let it come to room temp before using.
🙂
We did our Christmas in July celebration last weekend. It was a nice little get-together. It was very simple because I just don’t have the energy right now to do anything more than simple but next year I’m going to do it up right. A summer tree / beach theme / decorations / etc.
We do Mexican food for our Christmas so I stayed with the same theme for July Christmas. I didn’t take a lot of pics but here’s part of my plate…
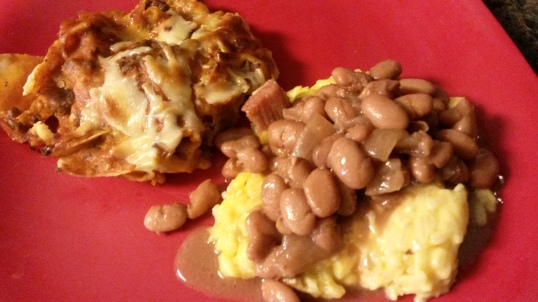
Enchilada casserole. Pintos. Cheesy jalapeño rice. We also had 5 layer dip and queso.
I used this new flavor pack for the guacamole. It’s really good.
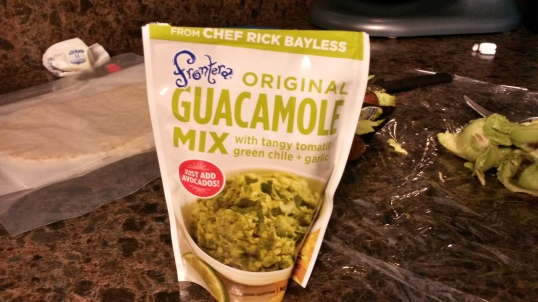
The directions say to use the whole pack with just 2 avocados. I only use one big heaping tbsp per avocado plus one tbsp sour cream per avocado. My version is getting rave reviews here from everyone who tries it.
I also used my new toy to make some sugar free Watermelon Sherbet for a take on the lime / ginger-ale punch. I made the ginger-ale with my Sodastream (sugar free).
It didn’t get the same rave reviews as the new guac mix…but I really enjoyed it. Lime is better but I wanted to try something more ‘summery’.
For desert I made a sugar free Dr. Pepper cake. I used my tried and true recipe just subbing various sugar free sweeteners.
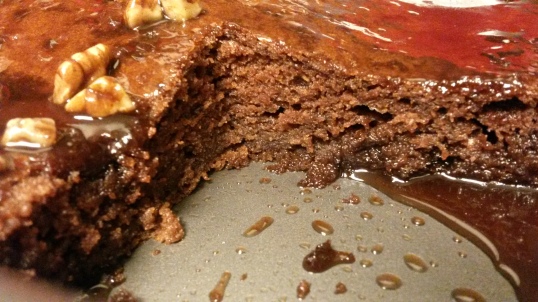
I couldn’t believe I was able to create something that moist using gluten free flour and sugar free subs.

Boiling alternative sugar to make…
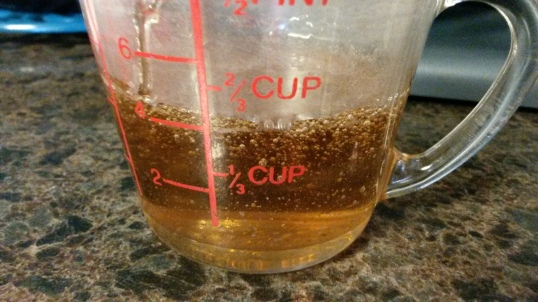
…a sugar free syrup to use in…
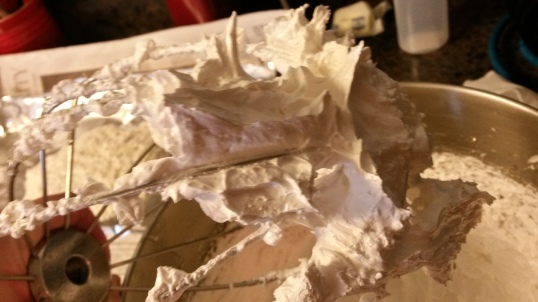
…homemade sugar free marshmallow fluff. (This was ridiculously good. I used it in place of the real marshmallows called for in the recipe).
I made the sugar free ‘Dr Pepper’ with the Sodastream and I couldn’t have been happier with the way the cake came together.
I think I’ve finally found my alternative sugar blend and I’ll share it here next month when I start experimenting with it a little bit more. Up to now I’ve only experimented with ice cream and this cake.
I had an anemia blood work profile done yesterday to get a better look at what’s going on with that and I’m getting a massage this weekend.
Hope y’all’ve had a great week and have a safe / cool weekend. 🙂
